Written by Tamara Kwan of TammyLynn Photography
Featured on I am Gloucestershire 365's website under FYI Daily Blog on Thursday, 27 January 2011
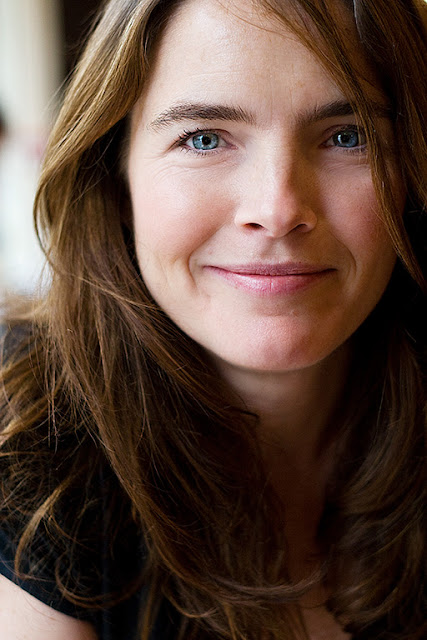
You don’t need a lot of fancy equipment or a huge studio to make a nice portrait; just some lovely light and a camera. Having a lovely model doesn’t hurt either. The above photo of Lorca was taken in a local coffee shop with just a hand held camera; with very little post processing done on the image; no extra lighting or equipment was used.
The scene for the above photograph....I’m sitting in a local coffee house enjoying a morning coffee with a friend. It was a cloudy overcast morning down in the Stroud Valley and we were sitting by some nice large windows. This combination acts like a huge soft box for diffusing the light, making it nice and soft. There was sufficient light bouncing around the room to add some fill light on the right side of her face.
The only photographic equipment I used was a DSLR, Canon 30D, with a nifty fifty lens. (50mm f/1.8 prime lens) This is a favourite lens among photographers because it’s small, light and cheap but is very clear, sharp and fast. Not fast as in auto focusing, this can be a bit slow at times. When you hear a photographer refer to a lens as fast what they are actually talking about is how large the maximum aperture is. The larger the aperture, the more light that gets through, the faster your shutter speed can be. So having a fast lens means that you can use faster shutter speeds in lower light situations. It also means that you’ll have a much shallower Depth of Field (DOF) when set to the larger apertures which can make for a pleasing out of focus background.
Now that the scene is set, what camera settings did I use? Well it wasn’t particularly bright in the coffee shop, though in the image it looks lovely and bright. How did I achieve this? This is down to my camera settings. With camera in manual mode, ISO set to 800 (for low light), an exposure of 1/200th of a second (shutter speed) and an f stop of 2.5. F stop refers to how large the aperture is, as discussed above. The smaller the number the larger the opening, the more light gets in, the shallower the DOF. The larger the number the smaller the opening, lesser light gets in, the greater the DOF. I was using the camera’s internal light meter to help me decide which settings to use for this situation. I could have easily used different settings to achieve pretty much the same photograph.
We mustn’t forget about composition, as that can make or break a photograph. As you can see in the above photograph I positioned most of her face in the upper right third of the images. This is within following the photographer’s golden rule of thirds. Putting your subject on the third makes for a much more pleasing image than placing it smack dab in the centre. Well most of the time it does, there are situations where putting your subject in the dead centre just works.
Another little rule for photographs is the left to right rule. As we read from left to right then most compositions work better if they pull your eye from left to right in the photograph. We do this mostly with lead in lines or with light. My portrait above doesn’t exactly follow that rule, as it is much brighter on the left than the right your eye is pulled right to left. If you have a strong image you can sometimes get away with that. In the case above, her eyes are strong enough to hold your attention.
Speaking of eyes, when taking portraits of people or animals the eyes are the most important part of the photograph. The eyes must be sharp, so make sure you focus on those.
So to recap, what’s making the above a nice portrait? The large natural diffused light source, the composition on the thirds, the shallow DOF with nice out of focus background and the eyes nice and sharp and bright. Oh, and a pretty smile. J


