Saturday, 17 October 2009
Must write in Blog more....
Wow, it's been a while since I've written in here. Shame really I've had lots going on that I could be writing about. Funny that, when I've got time to write stuff there's nothing going on I want to write about. C'est La Vie. :-)
Monday, 13 July 2009
12-July-09 Cycling with the Wheelers
We went cycling with the Stonehouse Wheelers yesterday. It was a picnic ride and not to be missed. I almost did miss it though, as it was a double hilly ride and I wasn't feeling well that morning. I just didn't think I could survive cycling down and then up and out of the valley, but I didn't want to miss the picnic. I went anyway, grumbling all the way to the starting point. To myself mostly, though I do think Peter sensed my desire not to be there.
The ride started strait up hill and I was thinking, oh dear, what have I gotten myself into. I knew this hill, it's a long hard climb up out of the valley then across the windy top. I got off to a great start in the wrong gear! Had to stop and set my gears as the hill was too steep to set them while cycling. I had to get off and walk a couple of times but I made it! At the top was the ice-cream van as expected and Peter treated me to a fruit pop. At this point I noticed what a beautiful day it had turned out to be. I thought for sure we'd be rained upon and I didn't bring my camera. I was really wishing I'd brought it now.
After a short rest we took off again. I think Bill, our leader, was hunting for more hills to climb as he sure was finding them! The downhill bits were fun though. :-D
We finally made it to the picnic spot and everyone got comfy, some pulling out picnic blankets and everyone pulling out food to eat and share. We got our picnic blanket out and set up our little picnic. We brought sandwiches for us and enough fruit to share. We also brought a couple of plastic wine glasses to drink some Pimms in, which amused everyone. Others brought home made cakes and biscuits (cookies) to share. A few brought out flask filled with hot tea, they must have their tea! :-D
After a bite to eat some of us went off to explore an old abandoned church that was near by. I always find places like this fascinating, so much so that I risked the sting of stinging nettles against my legs to get a closer look, both legs taking a hit. Again I wish I'd brought my camera! The grounds were all grown up and the church all boarded up. It was quite an old church and it was a bit in ruin. Around the backside of the church we found a window that wasn't boarded up that we could peak inside. There was no glass in the window and it had bars and wire like stuff across it. Oh and Crime Scene tape! I peaked into the church through the window and waited for my eyes to adjust to the darkness. Too bad I hadn't brought a torch (flash light) with me! Couldn't see much, looked like it was being used to store junk. Will definitely have to investigate and see if I can't locate who's got the key to the place, I'd love to go back for further investigation and photo taking. Did I mention the place was for sale? Anyone wanna buy an old church with me? Complete with cemetery?! :-D
Back on the road our leader felt the need to find a few more hills for us to climb. Luckily he couldn't find any huge ones as we were already quite high up. The decent down into the valley was oh so fun! It didn't take us long to get back home. Well for most people that is, we still had a hill to climb! Oh the joys of living up on the side of the Valley, at least the view is worth it. ;-)
Saturday, 11 July 2009
How to use the High Pass filter for Sharpening
As with anything in the photo editing world, there are many different ways to do something. This is how I use the High pass filter for sharpening....
-First open up your image in Photoshop.
File>Open or drag and drop image into PS.
-Make a duplicate background layer.
Layer>Duplicate Layer or right click on background layer>Duplicate Layer.
-With Background Copy selected change layer properties from Normal to Overlay.
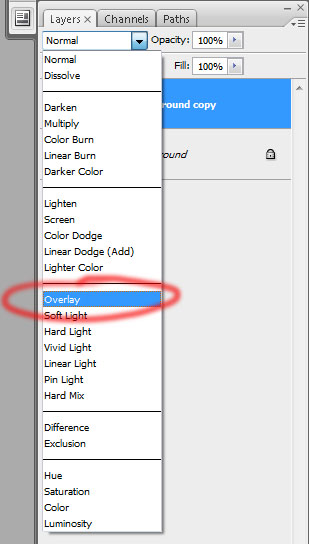
Don't panic! You will see a change in your image, ignore that for now, it is only temporary, I promise.
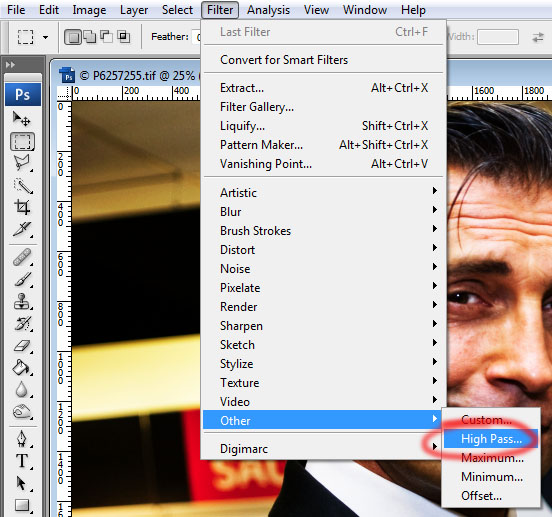
-With Background Copy selected on your layer's pallet open the High Pass filter tool. Filter>Other>High Pass
-Use the slider at the bottom of the High Pass box to adjust the amount of sharpening that you'd like. I can't give you a figure because every image will be different. With the Preview box checked you can see the results on your images, I recommend zooming in to 100% to see the details of the sharpening. (Ctrl plus =+ key zooms in on PC)
-When desired effect is achieved then press OK. Now you can compare your new background copy with the original background. I recommend comparing full resolution as well as full image. (clicking on the eye in the layer pallet next to the desired layer will turn that layer off and on)
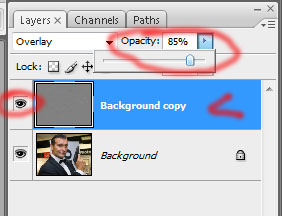
-If you feel you've over done it, don't panic! Just change the Opacity of the background copy layer until you get your desired effect. Some people even recommend over doing it and then adjusting the layer Opacity to suit.
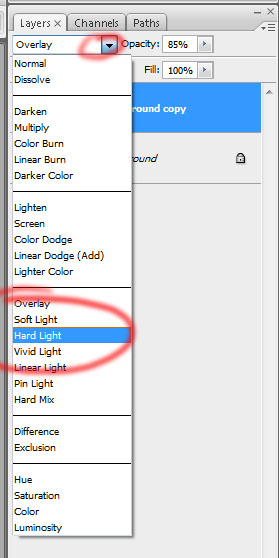
Next you can adjust the lighting effect of your sharpening by changing the layer properties from Overlay to Soft Light or Hard Light or what ever you like in the drop down box.
When you are done editing your photo remember to flatten before saving, unless you are saving as a photoshop document for further editing later.
-First open up your image in Photoshop.
File>Open or drag and drop image into PS.
-Make a duplicate background layer.
Layer>Duplicate Layer or right click on background layer>Duplicate Layer.
-With Background Copy selected change layer properties from Normal to Overlay.
Don't panic! You will see a change in your image, ignore that for now, it is only temporary, I promise.
-With Background Copy selected on your layer's pallet open the High Pass filter tool. Filter>Other>High Pass
-Use the slider at the bottom of the High Pass box to adjust the amount of sharpening that you'd like. I can't give you a figure because every image will be different. With the Preview box checked you can see the results on your images, I recommend zooming in to 100% to see the details of the sharpening. (Ctrl plus =+ key zooms in on PC)
-When desired effect is achieved then press OK. Now you can compare your new background copy with the original background. I recommend comparing full resolution as well as full image. (clicking on the eye in the layer pallet next to the desired layer will turn that layer off and on)
-If you feel you've over done it, don't panic! Just change the Opacity of the background copy layer until you get your desired effect. Some people even recommend over doing it and then adjusting the layer Opacity to suit.
Next you can adjust the lighting effect of your sharpening by changing the layer properties from Overlay to Soft Light or Hard Light or what ever you like in the drop down box.
When you are done editing your photo remember to flatten before saving, unless you are saving as a photoshop document for further editing later.
Friday, 10 July 2009
Sharpening with the High Pass filter
Sharpening with the High Pass filter in Photoshop is so easy, why I haven't been doing this all along I don't know! Well yea I do, I only just now figured out how to use it. I heard about this High Pass filter thing years ago but never tried it. Now that I have I'm like, WOW, why haven't I been doing this all along?
This High Pass sharpening is also really great if you have any noise in your photo, because it doesn't sharpen the noise like using the UnSharp Mask tool does.
I'll knock up some examples...brb
OK, Here is an image that I just played around with. Might not be the best example but it's the one I wanted to play with. :-)
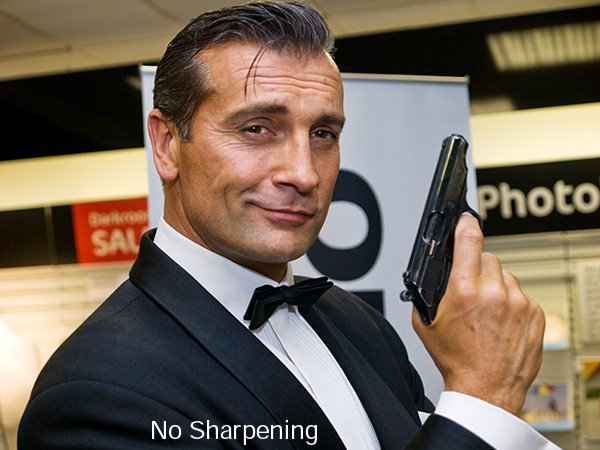


As you can see in these small photos with the amount of processing I did the difference is subtle. On close inspection there is more noise in the Unsharp Mask one. I decided to push the High pass one to see how far I could push it before there was noticeable noise in the image and it looked over sharpened. This is my result:

I couldn't get this sharp an image from the above file with the unsharp mask filter without a lot of noise and a bit of distortion. I'm quite impressed with the High Pass way of sharpening images and will be investigating further.
Next I'll explain how I used the High Pass Filter.
This High Pass sharpening is also really great if you have any noise in your photo, because it doesn't sharpen the noise like using the UnSharp Mask tool does.
I'll knock up some examples...brb
OK, Here is an image that I just played around with. Might not be the best example but it's the one I wanted to play with. :-)
As you can see in these small photos with the amount of processing I did the difference is subtle. On close inspection there is more noise in the Unsharp Mask one. I decided to push the High pass one to see how far I could push it before there was noticeable noise in the image and it looked over sharpened. This is my result:
I couldn't get this sharp an image from the above file with the unsharp mask filter without a lot of noise and a bit of distortion. I'm quite impressed with the High Pass way of sharpening images and will be investigating further.
Next I'll explain how I used the High Pass Filter.
Thursday, 9 July 2009
Blogging time Again! :-D
I'm gearing up to start blogging again. I've started off by discovering how to make the blogging page wider so that I can add larger photos than before. :-D
Now I need to go find some photos to add. How about I start with this photo of my daughter Sarah that I recently took on a trip to the States. I miss my baby.

Hey it worked! Cool beans. :-D
Now I need to go find some photos to add. How about I start with this photo of my daughter Sarah that I recently took on a trip to the States. I miss my baby.
Hey it worked! Cool beans. :-D
Thursday, 1 January 2009
Happy New Year! 2009!
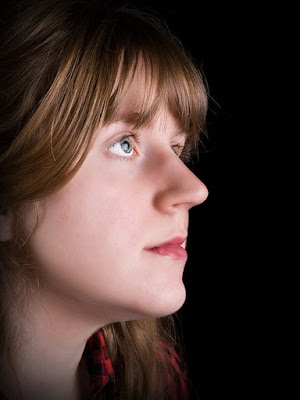
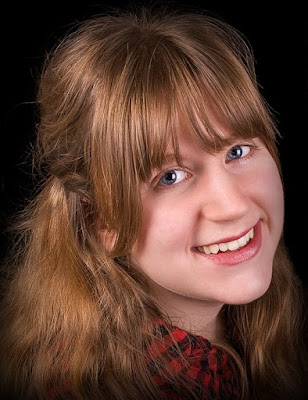
I spent New Years day doing a photoshoot with my two beautiful daughters. I can't think of a better way to start off the New Year! :-D Here are some of my favourites from today.

 This is absolutely my favourite shot.


 This is absolutely my favourite shot.


Subscribe to:
Posts (Atom)